

Totally tapa: Conservation of Ngatu tā’uli
Conservation staff regularly devise unique solutions and techniques to allow large contemporary art works to be safely and elegantly displayed. Here is an insight into the behind-the-scenes work that went towards successfully displaying Ngatu tā’uli 2011 (illustrated)
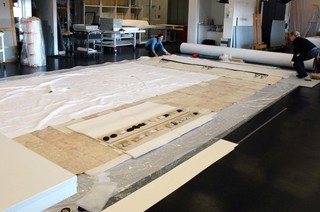
The arrival of the tapa was greatly anticipated, not only due to its majestic style and size but also because it was arriving just a week or so before the opening of ‘Threads: Contemporary Textiles and the Social Fabric’. Due to time constraints, conservators needed to carry out detailed planning to ensure the tapa could be installed as safely and efficiently as possible. Prior to this, Conservation staff prepared all the necessary materials and equipment needed for the install and display of this work, including heavy-weight Japanese tissue, acid-free blotting paper, wheat starch paste, velcro (without a self-adhesive backing), conservation-grade adhesive to adhere the velcro to the paper, thick pressing felts, weights, foam and flannelette sheeting.

Unrolling the tapa to measure it / View full image
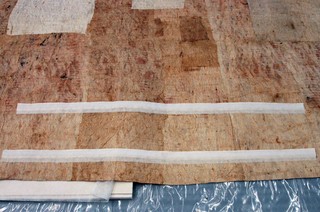
When the tapa arrived, it was moved into the GOMA Conservation laboratory for treatment, during which we attached paper and velcro support tabs to help spread the weight of the tapa evenly for the duration of its display. (The tabs prevent excessive and uneven pressure being exerted on the art work, which can cause its deformation and even tearing.) The GOMA Conservation lab is designed to accommodate large contemporary works, but the tapa was too long to be fully unrolled, so we worked on sections at a time.

The tapa, unrolled in sections in the GOMA Conservation laboratory / View full image
The hinges were made by our Conservation Technician, using Japanese paper conservation techniques. Although tapa is not paper, it has similar properties and so paper conservation methods can be also used for tapa conservation. The hinges, made with heavy-weight Japanese tissue paper and velcro, were constructed before the tapa arrived because they take time to make.

More detailed measurements are taken before the hinges are adhered to the back of the tapa / View full image
A conservation-grade adhesive was used to adhere the velcro to the paper, and then starch paste was applied to adhere the hinges to the back of the tapa. Although the paper and starch paste are very strong, the hinges can be easily removed by being slightly moistened with water.

Applying starch paste adhesive to a hinge / View full image
Once the hinges are in position, they are covered with weights — this ensures a strong bond, and that the tapa remains flat. They are left to dry overnight.

Blotters, felts, boards and weights over the hinges while they dried / View full image

A hinge after drying / View full image
Hinges are used because they prevent the tapa looking like it has been directly attached in a line down the wall. They allow the natural undulations in the material to remain, so it appears supported but unrestrained.
The final step was to attach a long, narrow paper casing to the end of the tapa that would hang freely. Our plan was that, if required, once the tapa was installed, a flat Perspex bar could be inserted into the casing. This was to provide some weight to the lower edge to prevent it from moving, just in case the air-conditioning — which comes from vents in the floor — caused it to billow. This was done as a precautionary measure, since we couldn’t be sure how the work would drape once it was installed. The casing couldn’t be attached after the work was installed because the treatment needs to be done with the art work in a flat, horizontal position.

A paper casing, to be attached to the lower edge of the tapa / Photographs: L Wild and N Harth © QAGOMA / View full image
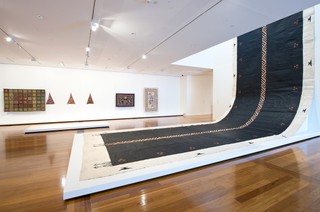
Kulupu Falehanga‘i Teleiloa, New Zealand/Tonga est. 2010 / Ngatu tā’uli 2011 / Koka (pigment from koka tree) and black commercial paint on Hiapo (paper mulberry) barkcloth / 2215 x 420cm / Commissioned 2011. QAG Foundation / Collection: Queensland Art Gallery | Gallery of Modern Art / © The artists / View full image
Liz Wild is Conservator (Sculpture), QAGOMA